
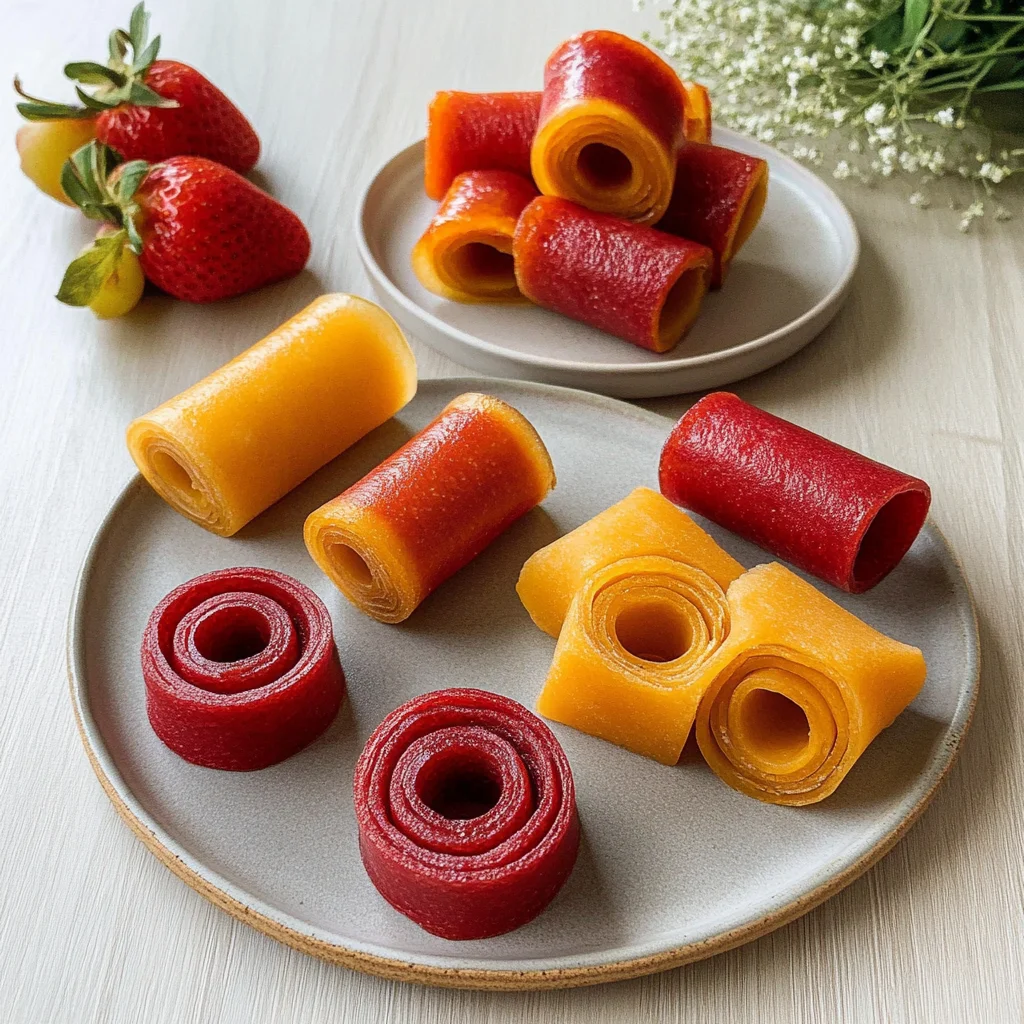
Imagine biting into a chewy, sweet strip of sunshine that bursts with the vibrant flavors of your favorite fruits; this is what a fruit roll-up recipe promises. The aroma of freshly pureed fruit wafts through the air, mingling with a hint of nostalgia as you reminisce about carefree afternoons spent savoring these delightful treats.
As you roll out this simple yet satisfying creation in your kitchen, memories flood back—perhaps shared laughter during family gatherings or snacks at sleepovers. Perfect for lunchboxes or a fun afternoon snack, these homemade fruit roll-ups offer not just an amazing flavor experience but also a healthy twist that’ll keep both kids and adults coming back for more.
Why Is fruit roll up recipe So Irresistibly Good?
Deliciously natural flavors shine through with just 2 cups of fresh fruit. Customizable to your taste, you can use strawberries, mangoes, or apples. Sweetened to perfection with a touch of honey and brightened by lemon juice, each bite is a delightful burst of fruity goodness. Effortlessly made in just 15 minutes of prep time and a low-effort 240 minutes in the oven, this recipe saves you time while impressing family and friends alike. Healthy, homemade, and oh-so-satisfying—it’s no wonder everyone will keep coming back for more!
Ingredients for fruit roll up recipe
- 2 cups fresh fruit (such as strawberries, mangoes, or apples) – Choose ripe, juicy fruit for the best flavor; feel free to mix your favorites!
- 1 tablespoon honey (optional, for sweetness) – Add more or less honey based on your preferred level of sweetness in this fruit roll up recipe.
- 1 tablespoon lemon juice (to enhance flavor) – This brightens the natural flavors of the fruit and helps balance the sweetness.
Directions: fruit roll up recipe

1. Wash and Chop: Start by washing your fresh fruit, whether you choose vibrant strawberries, sweet mangoes, or crisp apples. Chop them into small pieces to make blending easier.
2. Blend Smoothly: In your blender, combine the chopped fruit and blend until it reaches a smooth consistency. This is where the magic begins as the colors and aromas come together!
3. Add Flavors: Pour in 1 tablespoon of honey for added sweetness (if desired) and 1 tablespoon of lemon juice to enhance the flavor. Blend again until everything is beautifully mixed.
4. Preheat Oven: Set your oven to 170°F (75°C). This low temperature will ensure that the fruit maintains its nutrients while transforming into a chewy delight.
5. Prepare Baking Sheet: Line a baking sheet with parchment paper. This will prevent sticking and make it easier to remove your delicious fruit leather later on.
6. Spread Puree: Carefully spread the fruit puree evenly over the parchment paper, aiming for about ¼ inch thick. A uniform layer helps it dry out evenly as it bakes.
7. Bake Away: Place your baking sheet in the oven and let it bake for 4-6 hours. You’ll know it’s ready when the fruit is no longer sticky to the touch—your kitchen will smell heavenly!
8. Cool Down: Once baked, remove the fruit leather from the oven and allow it to cool completely on the counter. This step is crucial for perfect texture!
9. Cut Strips: Using kitchen scissors or a sharp knife, cut the cooled fruit leather into strips. Roll them up tightly in parchment paper for a delightful snack presentation.
10. Store Properly: Place your rolled-up strips in an airtight container at room temperature. They’re perfect for on-the-go snacking or lunchbox treats!
Optional: Enjoy with a sprinkle of cinnamon for extra flavor!
Exact quantities are listed in the recipe card below.
Tips for the Best fruit roll up recipe
- Choose Ripe Fruit: Use fully ripe fruit for more natural sweetness and flavor. Overripe fruit can enhance the taste of your fruit roll up recipe.
- Avoid Too Much Liquid: Ensure your fruit puree isn’t too watery. Excess liquid can lead to a sticky result; blend just until smooth.
- Even Layering: Spread the puree evenly on the parchment paper. Uneven layers will bake inconsistently, leaving some parts too chewy.
- Monitor Baking Time: Keep an eye on your fruit during baking. Ovens vary, so check for doneness at the 4-hour mark to prevent over-drying.
- Cool Completely: Let the baked fruit leather cool fully before cutting. This helps maintain its shape and prevents sticking when you roll it up.
How to Store and Freeze fruit roll up recipe
- Room Temperature: Keep the fruit roll up recipe at room temperature for up to 2 days in a cool, dry place, wrapped in parchment paper.
- Fridge: Store in an airtight container in the fridge for up to 1 week. This helps maintain its chewiness while keeping it fresh.
- Freezer: For longer storage, freeze individual pieces of the fruit roll up recipe between layers of parchment paper in a freezer-safe bag for up to 3 months.
- Thawing: To enjoy frozen fruit rolls, simply remove from the freezer and let them thaw at room temperature for about 30 minutes before eating.
fruit roll up recipe Your Way
Let your creativity shine by customizing this fruity delight with different flavors and textures that excite your palate!
- Berry Blast: Swap in 2 cups of mixed berries like blueberries, raspberries, or blackberries. The natural sweetness and tanginess will elevate your rolls to a whole new level of deliciousness.
- Tropical Twist: Use 2 cups of diced pineapple or ripe mango for a sunny, tropical flavor. This variation adds a burst of sunshine to your snack, perfect for brightening up any day!
- Spicy Kick: Add a pinch of cayenne pepper or chili powder to the fruit puree for a surprising heat. This twist creates a delightful contrast between sweet and spicy, making your taste buds dance.
- Creamy Banana: Incorporate 1 cup of mashed ripe banana with another cup of your favorite fruit. The creamy texture gives your roll-ups a unique mouthfeel that’s both smooth and satisfying.
- Nutty Flavor: Blend in 1 tablespoon of almond or peanut butter into the fruit puree. This addition not only enhances the flavor but also adds protein and richness, making it even more filling.
- Citrus Zing: Replace lemon juice with lime juice or add some zest from an orange or grapefruit. The citrus notes will brighten the overall flavor profile while giving it an invigorating lift.
- Herb Infusion: Mix in fresh herbs like mint or basil for a refreshing twist. These aromatic herbs provide an unexpected depth that pairs beautifully with sweeter fruits.
- Choco Delight: Drizzle melted dark chocolate over the finished roll-ups before slicing. This indulgent addition creates a decadent treat that’s perfect for satisfying any sweet tooth!
Make Ahead Options

Preparing this fruit roll up recipe is a fantastic option for meal prep enthusiasts, allowing you to enjoy healthy snacks throughout the week. You can wash and chop your fresh fruit—whether you choose strawberries, mangoes, or apples—up to 24 hours in advance. Simply blend the fruit until smooth, then mix in honey and lemon juice for an extra flavor kick. Spread the pureed mixture on parchment paper and bake it at 170°F (75°C) for 4-6 hours. After cooling, cut into strips and roll them up in parchment paper. These homemade fruit roll-ups can be stored in an airtight container at room temperature for up to a week, making them a convenient and delightful treat ready whenever you are!
fruit roll up recipe Questions Answered
What type of fruit works best for this fruit roll-up recipe?
You can use a variety of fresh fruits such as strawberries, mangoes, or apples! Each brings its unique flavor, but make sure they are ripe for the best sweetness. For a balanced taste, mixing fruits like strawberries and bananas can create a delightful combination.
Can I adjust the sweetness of my fruit roll-ups?
Absolutely! The tablespoon of honey is optional, so feel free to adjust it according to your preference. If you prefer a sweeter roll-up, consider using overripe fruits that naturally have more sugar. You could also explore alternatives like agave syrup or maple syrup for a different flavor profile.
How should I store my homemade fruit roll-ups?
Once you’ve cut them into strips and rolled them up in parchment paper, place them in an airtight container. They can be stored at room temperature for up to 1-2 weeks. If you want them to last longer, consider refrigerating them where they can stay good for about a month!
Can I freeze my fruit roll-ups for later use?
Yes, freezing is a great option! After rolling them in parchment paper and placing them in an airtight container, you can freeze them for up to 6 months. Just remember to thaw them at room temperature before enjoying!
What should I do if my fruit leather is too sticky after baking?
If you find your fruit leather is still sticky after 4-6 hours of baking at 170°F (75°C), it probably needs more time in the oven. Keep an eye on it and check every 30 minutes until it reaches a non-sticky consistency. It should feel slightly tacky but not wet when done.
How many servings does this recipe yield?
This fruit roll-up recipe yields about 4 servings, with each serving containing around 80 calories. It’s perfect for sharing with family or saving as healthy snacks throughout the week!
Fruit Roll-Up
Ingredients
Method
- Wash and chop the fresh fruit into small pieces.
- Blend the fruit in a blender until smooth.
- Add honey and lemon juice, then blend again until well combined.
- Preheat the oven to 170°F (75°C).
- Line a baking sheet with parchment paper.
- Spread the fruit puree evenly on the parchment paper.
- Bake in the oven for 4-6 hours, or until the fruit is no longer sticky.
- Remove the fruit leather from the oven and let it cool.
- Cut into strips and roll them up in parchment paper.
- Store in an airtight container at room temperature.