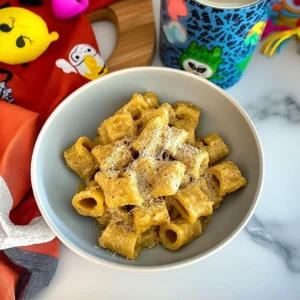

Imagine sinking your fork into a warm, gooey bowl of mac and cheese, where each bite is a delightful explosion of creamy cheese and perfectly cooked pasta. The aroma wafts through the air, teasing your senses with hints of buttery goodness and savory toppings that beckon you to dive in deeper.
Now, picture this dish transformed into a mac and cheese bar—an interactive feast where creativity reigns supreme! Whether it’s a casual get-together or a festive celebration, the customizable options allow everyone to craft their perfect bowl, making every bite an unforgettable adventure. Get ready for a flavor experience that will have your taste buds dancing and your heart smiling!
Why Is mac and cheese bar So Irresistibly Good?
Versatile options allow you to mix and match your favorite pasta types, from classic elbow macaroni to gluten-free choices. Creamy cheese sauce made from scratch envelops every bite in rich cheddar and mozzarella goodness. Endless toppings like crispy bacon bits, fresh green onions, and zesty jalapeños let everyone create their perfect bowl. Quick prep time of just 15 minutes makes it an easy meal for busy weeknights or fun gatherings. Crowd-pleaser status? Absolutely! This mac and cheese bar will have your family and friends raving for more.
mac and cheese bar Ingredients
For the Pasta
- 8 oz elbow macaroni (or any pasta of choice) – Choose your favorite pasta shape for this fun and interactive mac and cheese bar.
For the Cheese Sauce
- 4 tbsp unsalted butter – This adds richness and helps create a smooth, creamy sauce.
- 4 tbsp all-purpose flour – Used to thicken the cheese sauce for the perfect consistency.
- 3 cups milk (whole or 2%) – Milk is essential for achieving that luscious, creamy texture in your sauce.
- 2 cups cheddar cheese (shredded) – Cheddar provides a sharp flavor that makes this dish unforgettable.
- 1 cup mozzarella cheese (shredded) – Mozzarella adds creaminess and a delightful stretch to your mac and cheese.
- 1 tsp garlic powder – A hint of garlic enhances the overall flavor profile of the sauce.
- 1 tsp onion powder – This brings an extra layer of savory goodness to your cheesy creation.
- 1 tsp salt – Essential for balancing flavors and enhancing the taste of the dish.
- 1/2 tsp black pepper – Adds a mild kick that complements the creamy cheese sauce beautifully.
For the Toppings
- 1 cup bacon bits (cooked and crumbled) – Crispy bacon bits add a savory crunch that elevates your mac and cheese bar experience.
- 1 cup green onions (sliced) – Fresh green onions provide a pop of color and zingy flavor to each serving.
- 1 cup diced tomatoes – Juicy tomatoes add freshness and balance out the richness of the cheese sauce.
- 1 cup jalapeños (sliced) – For those who enjoy heat, sliced jalapeños bring a spicy kick to your meal.
- 1 cup bread crumbs (for topping) – Toasted breadcrumbs create a crunchy topping that contrasts nicely with the creamy pasta.
- 1 cup parmesan cheese (grated) – Grated parmesan finishes off your mac and cheese bar with a flavorful, cheesy crust.
Step-by-Step mac and cheese bar

1. Boil Pasta: Bring a large pot of salted water to a boil. Add the 8 oz elbow macaroni and cook according to package instructions until al dente, usually about 7-9 minutes. Drain and set aside.
2. Melt Butter: In the same pot, melt 4 tbsp unsalted butter over medium heat. Stir in 4 tbsp all-purpose flour and cook for 1-2 minutes until golden, forming a roux that will thicken your cheese sauce.
3. Whisk in Milk: Gradually whisk in 3 cups of milk (whole or 2%), stirring constantly until the mixture thickens, which should take about 5-7 minutes. It should be creamy and smooth.
4. Add Cheese: Remove from heat and stir in 2 cups cheddar cheese (shredded) and 1 cup mozzarella cheese (shredded) until melted and smooth. Season with 1 tsp garlic powder, 1 tsp onion powder, 1 tsp salt, and 1/2 tsp black pepper for flavor.
5. Combine Pasta: Add the cooked pasta to the cheese sauce and mix until well coated, ensuring every noodle is luxuriously enveloped in cheesy goodness.
6. Transfer to Dish: Carefully transfer the mac and cheese mixture to a baking dish. Top with desired toppings such as 1 cup bacon bits (cooked and crumbled), 1 cup green onions (sliced), diced tomatoes, jalapeños, bread crumbs, and parmesan cheese.
7. Bake: Bake in a preheated oven at 350°F (175°C) for 15-20 minutes until bubbly and golden on top, creating a delightful contrast of textures.
8. Serve Hot: Serve hot and let guests customize their mac and cheese bar with additional toppings for an interactive meal experience full of flavor!
Optional: Sprinkle extra green onions on top before serving for added freshness.
Exact quantities are listed in the recipe card below.
Pro Tips for mac and cheese bar
- Perfect Pasta Cook: Ensure your pasta is al dente; overcooking can lead to mushy results after baking in the mac and cheese bar.
- Butter Timing: Melt the butter before adding flour; this prevents clumping and ensures a smooth cheese sauce.
- Milk Gradually: Whisk in milk slowly to avoid lumps, creating a creamy texture that’s essential for a dreamy cheese sauce.
- Cheese Variety: Experiment with different cheeses like Gouda or Gruyère for unique flavors that elevate your mac and cheese bar.
- Avoid Soggy Toppings: Bake toppings separately if you’re using fresh ingredients like tomatoes or green onions to prevent sogginess.
- Layer Smartly: Add toppings both on top and mixed into the cheese for balanced flavor throughout your customizable mac and cheese bar.
How to Store and Freeze mac and cheese bar
- Fridge: Store leftover mac and cheese bar in an airtight container for up to 3 days. Make sure it’s completely cooled before sealing.
- Freezer: For longer storage, freeze the mac and cheese bar in a freezer-safe container for up to 2 months. Label with the date for easy tracking.
- Reheating: To reheat, thaw overnight in the fridge, then warm it gently in the oven or microwave until heated through. Add a splash of milk to restore creaminess if needed.
- Toppings Storage: Keep perishable toppings like bacon bits and sliced tomatoes separate in the fridge for up to 3 days to maintain freshness when enjoying your mac and cheese bar later.
mac and cheese bar Your Way
Unleash your creativity and make this dish truly yours with these delightful twists and swaps!
- Gluten-Free: Substitute elbow macaroni with gluten-free pasta for a deliciously creamy experience that everyone can enjoy. The texture remains comforting, ensuring no one misses out on the fun.
- Spicy Kick: Add crushed red pepper flakes or cayenne pepper to your cheese sauce for that extra heat. It’s a simple way to elevate the flavor profile, making each bite exciting.
- Veggie Delight: Toss in sautéed spinach, broccoli, or bell peppers into the cheese sauce for added nutrition and color. This not only enhances the dish visually but also adds a fresh crunch that complements the creaminess perfectly.
- Smoky Flavor: Incorporate smoked gouda or add a touch of liquid smoke to the cheese sauce for a rich, smoky taste. This twist transforms your mac and cheese into an unforgettable experience with layers of flavor.
- Creamy Dream: Swap half of the milk with heavy cream for an ultra-rich and velvety sauce. The result is an indulgent treat that feels like a warm hug on a plate.
- Mediterranean Flair: Mix in feta cheese and olives along with diced tomatoes for a Mediterranean twist. The brininess of the olives pairs beautifully with the creamy sauce, creating a unique and satisfying dish.
- Herb Infusion: Add fresh herbs like basil or thyme to the cheese sauce for fragrant notes. This simple addition brightens up the dish and makes it feel more gourmet without much effort.
Make Ahead Options

This mac and cheese bar is a fantastic choice for meal prep, allowing you to save time without sacrificing flavor. You can easily prepare the pasta by bringing a large pot of salted water to a boil, cooking 8 oz of elbow macaroni until al dente, then draining and setting it aside. For the cheese sauce, melt 4 tbsp of unsalted butter in the same pot, stir in 4 tbsp of all-purpose flour for 1-2 minutes, and gradually whisk in 3 cups of milk until thickened. After adding 2 cups each of shredded cheddar and mozzarella cheeses along with seasonings, combine it with the pasta. You can store this mixture in the refrigerator for up to 3 days. When you’re ready to serve, simply transfer it to a baking dish, top with your choice of toppings like 1 cup of bacon bits or green onions, then bake at 350°F for 15-20 minutes until bubbly and golden. Enjoy the ease of a customizable mac and cheese bar that’s always ready to impress!
mac and cheese bar Recipe FAQs
What type of pasta can I use for the mac and cheese bar?
You can use 8 oz of elbow macaroni, but feel free to get creative! Fusilli, penne, or even gluten-free pasta work beautifully. Just ensure that whatever pasta you choose cooks to al dente for the best texture.
How can I store leftover mac and cheese?
If you have any leftovers (though I doubt it!), let them cool completely before transferring them to an airtight container. The mac and cheese can be stored in the fridge for up to 3 days. Just reheat in the oven or microwave until warmed through.
Can I freeze my mac and cheese bar?
Absolutely! To freeze, allow your baked mac and cheese to cool fully, then portion it into freezer-safe containers. It will keep well for up to 2 months. When you’re ready to enjoy it again, just thaw overnight in the fridge and reheat in a 350°F (175°C) oven until bubbly—about 20-25 minutes.
What are some topping suggestions for my mac and cheese bar?
The beauty of a mac and cheese bar is its customization! Besides the suggested toppings like bacon bits, green onions, diced tomatoes, jalapeños, bread crumbs, and parmesan cheese, you can add sautéed mushrooms, roasted red peppers, or even different types of cheeses like gouda or feta for a gourmet twist!
How many servings does this recipe make?
This delightful mac and cheese bar recipe serves about 4 people generously. If you’re hosting a gathering or family dinner, consider doubling the ingredients so everyone can indulge!
What should I do if my cheese sauce isn’t thickening?
If your sauce seems too thin after whisking in the milk, don’t worry! Continue cooking over medium heat while stirring frequently—this should help it thicken up within a few minutes. If it’s still not thickening after about 5 minutes, you might need to add a bit more flour mixed with some cold milk to create a slurry before adding it back into the pot.